This is a story about friendship. And eggs.
Many of the most rewarding relationships in my life are friendships formed when we lived in Asia, the Mediterranean, and Europe. Our family friendship with the people in this story, Nancy, Maddy, and Cabby, began in Taiwan in the 1990s. We forged relationships in the midst of howling typhoons and bed-shaking earthquakes, during Thanksgiving pig roasts, in delivery rooms birthing babies, on hillside picnics with roaming water buffalo [transcendent-picnics], at uncountable dinner parties in each other’s homes, and on apartment rooftops.
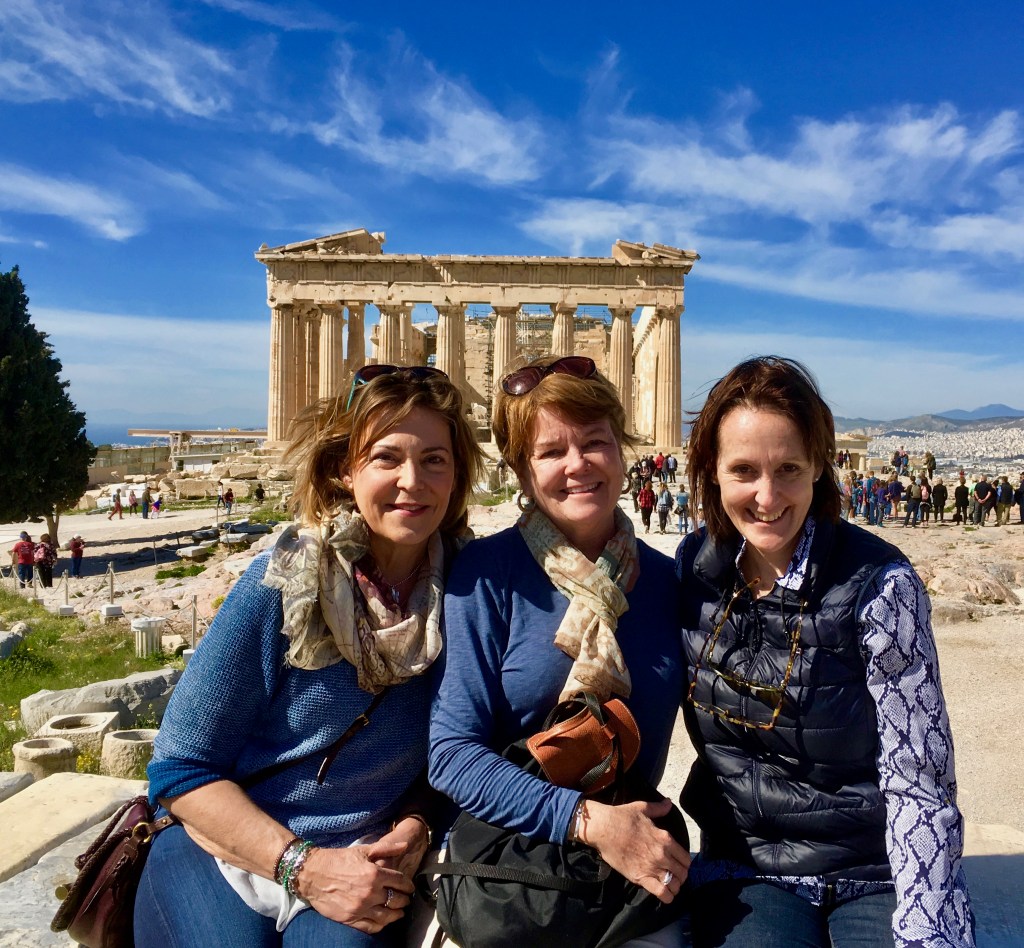
In 2018, we decided to have a reunion in Greece. Shortly before Easter, Nancy flew from New York to Paris where I was living. Together we traveled to Athens where Maddy and Cabby are now living.
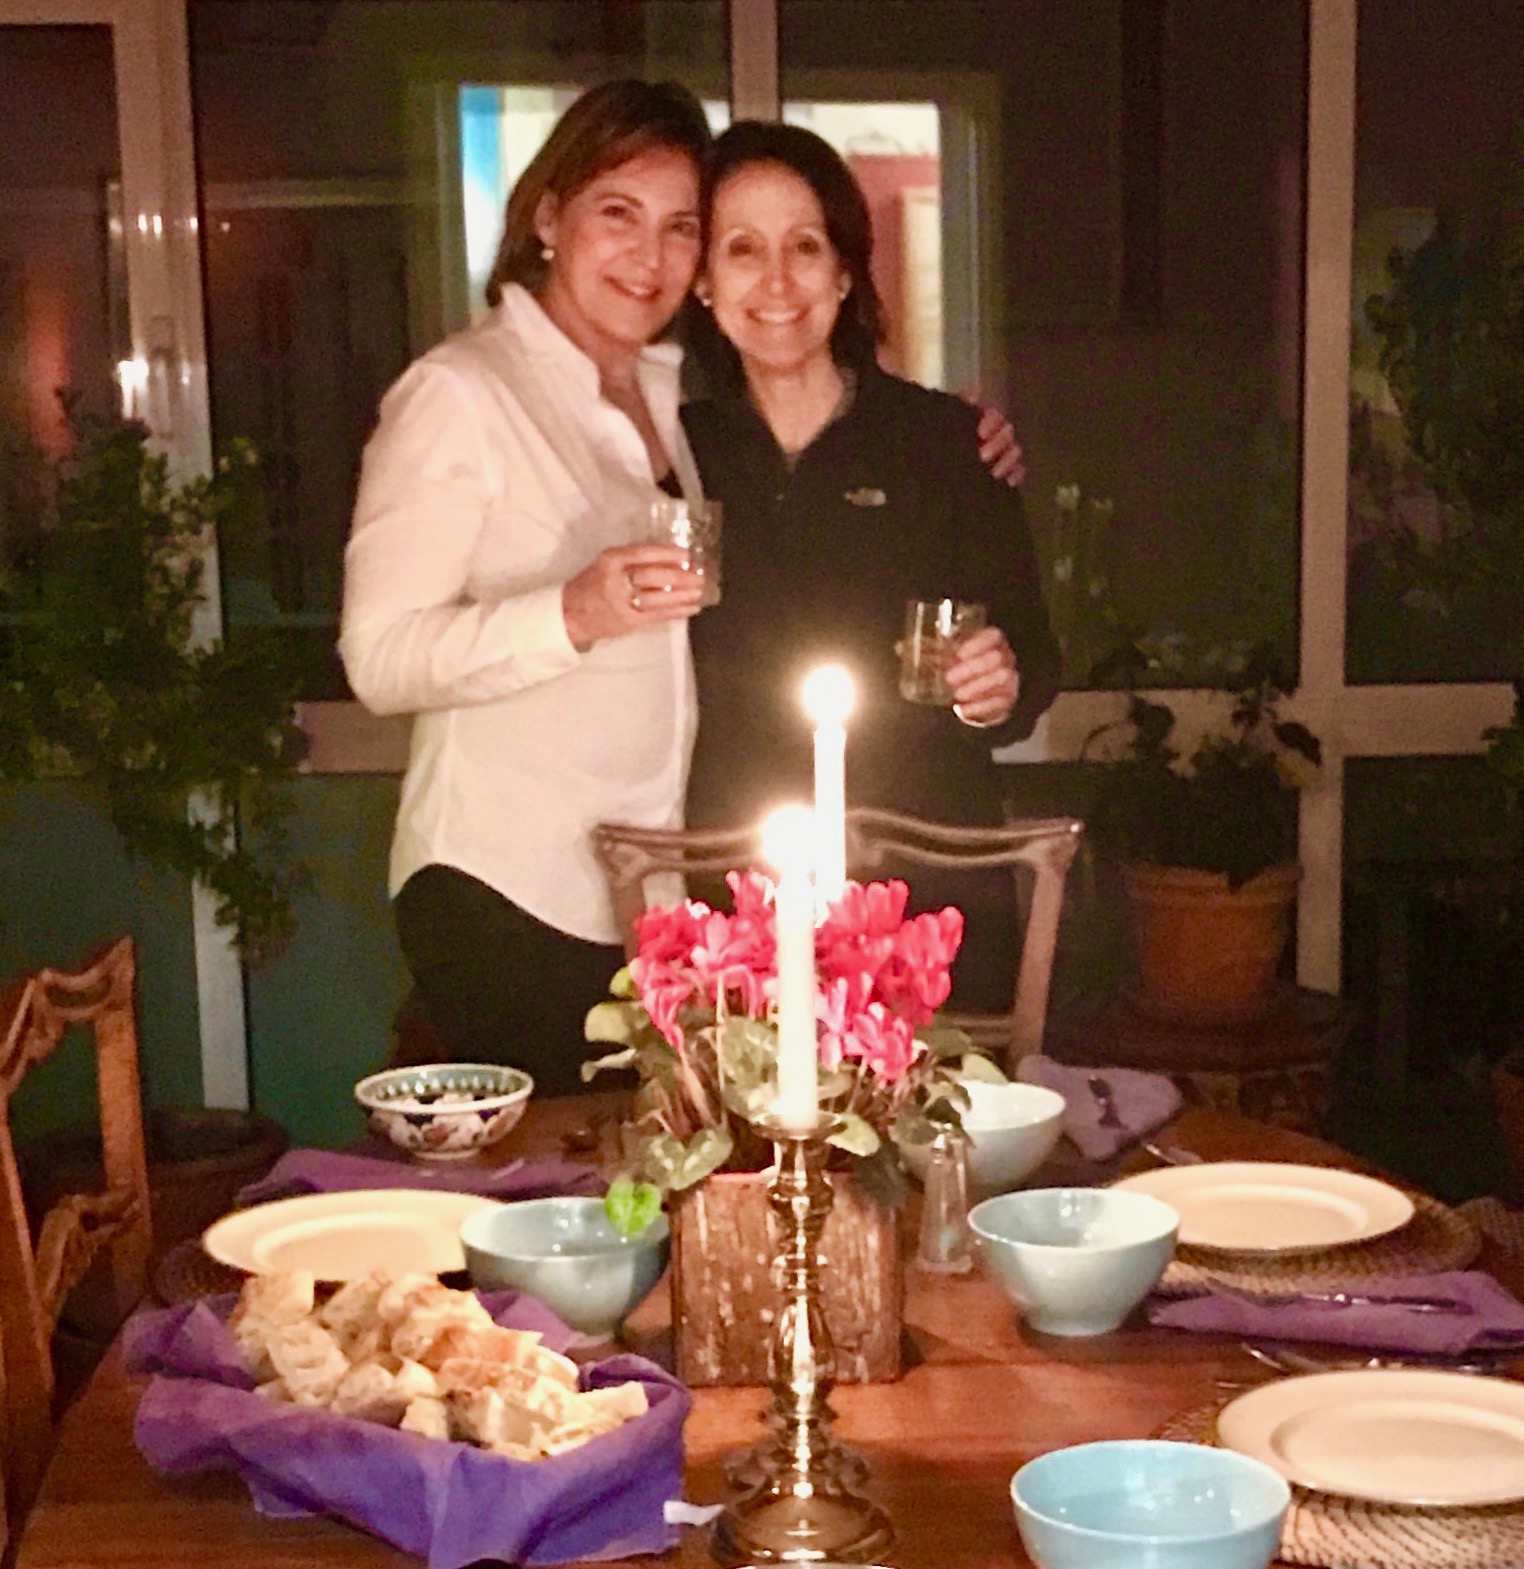


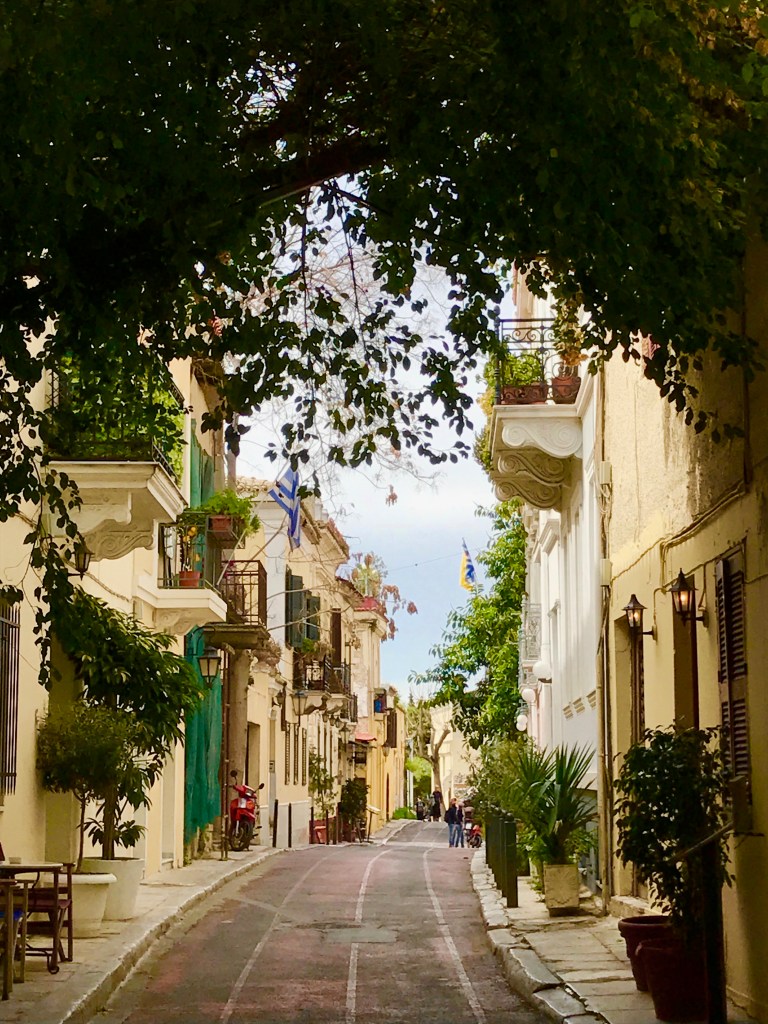
In Greece, we shed our Asian history and jumped right into a mix of antiquity and contemporary adventures. As we climbed to the rooftop of their home, the Acropolis and Parthenon appeared stage center before our eyes. Hellooooooo Athina.

Mornings began with breakfast carried to the roof–an image imprinted forever in my mind. Strong French-pressed coffee, a bowl of Greek yogurt with sour cherries spooned on top, a basket of buttered toast, hardboiled eggs. And that view…


Family and holiday traditions are often a shared experience with friends overseas. During the Taiwan years, when our children were young, Maddy and Cabby hosted an annual family-centered party at Easter time. Eggs, dyed and decorated, were hung from dried branches standing upright in a tall vase to form a colorful egg tree. Multiple families were invited. There was food and a ceremony involving candles and a song. Then the eggs were selected from the tree, one to each person, and taken home in carefully packed containers.

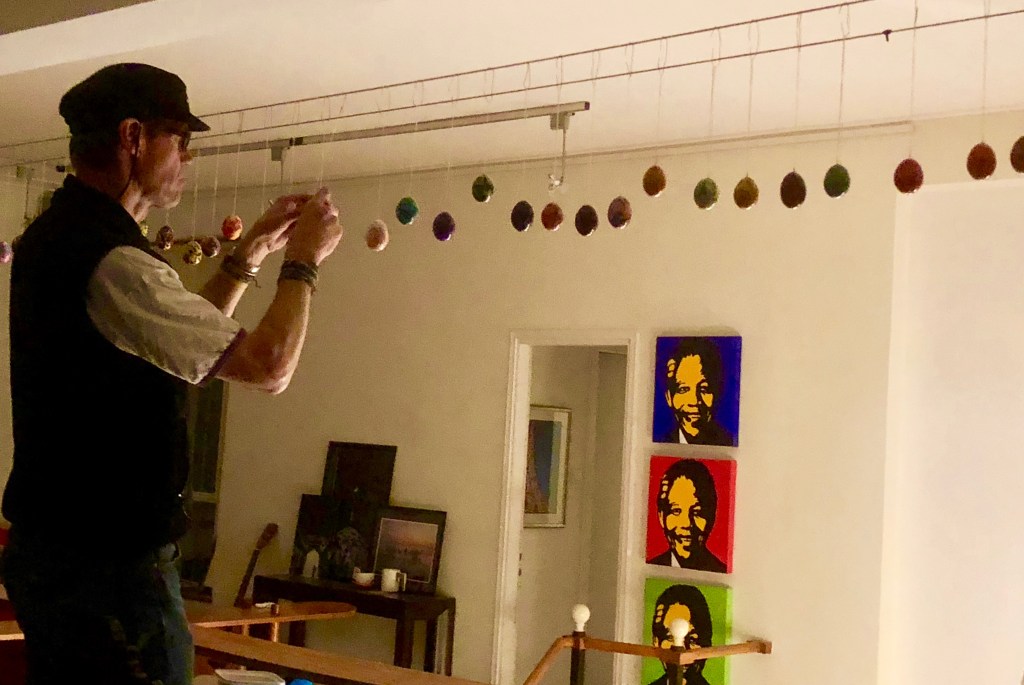
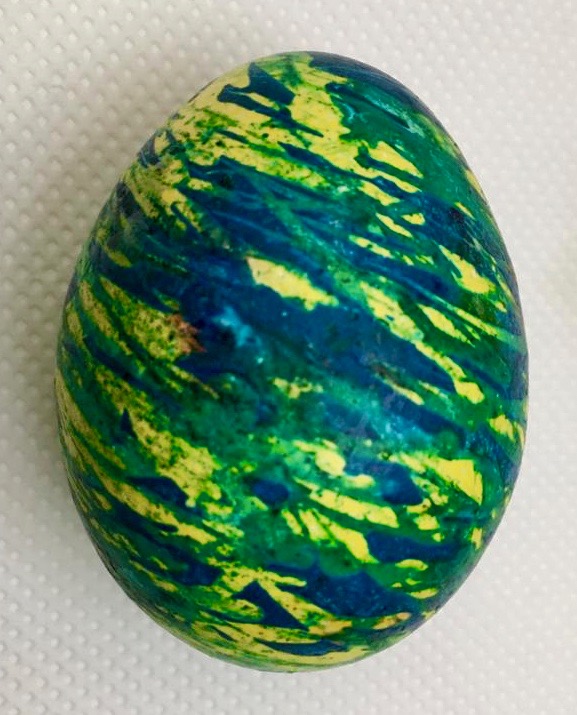
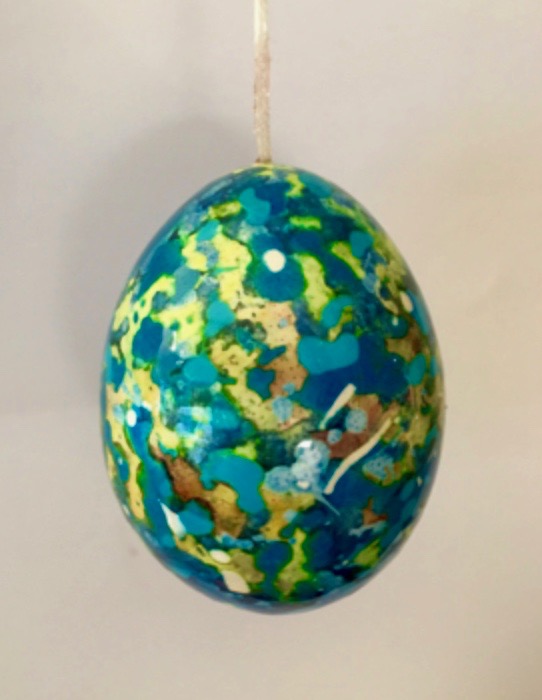
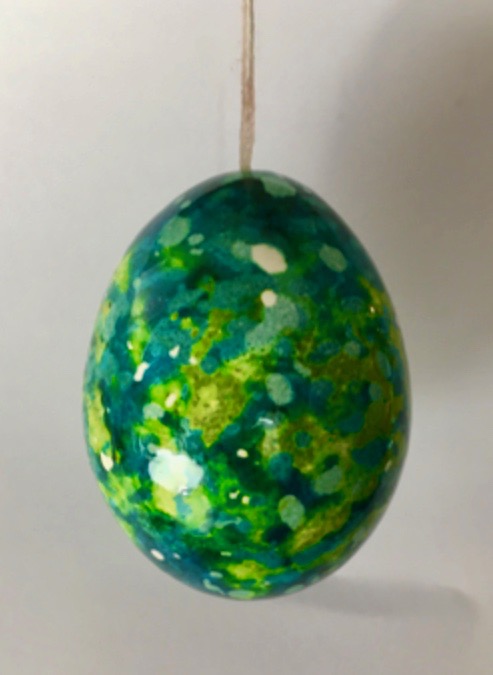
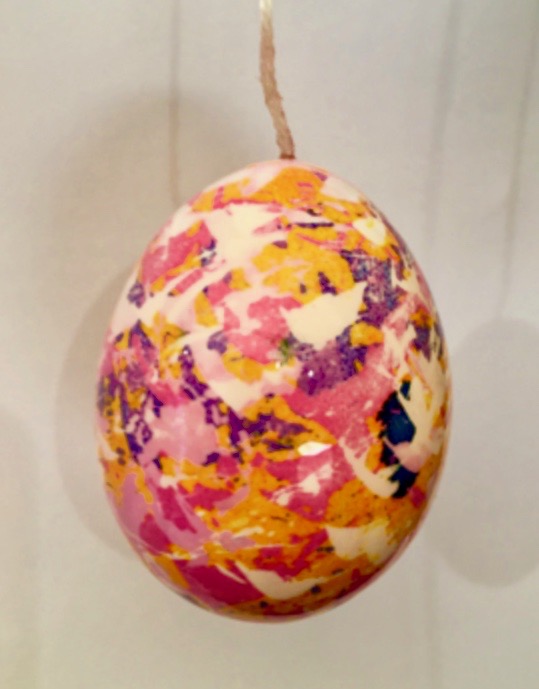
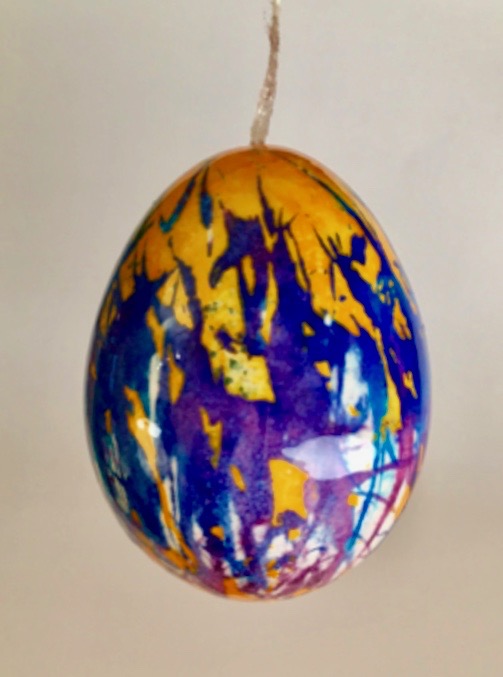
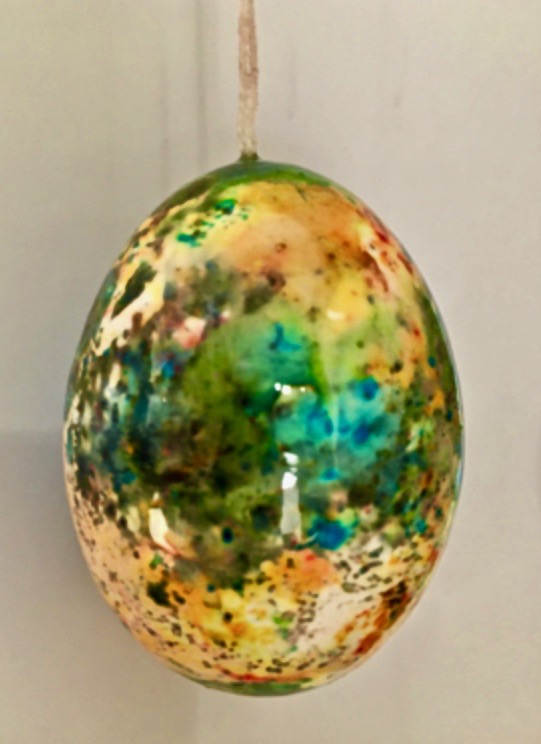
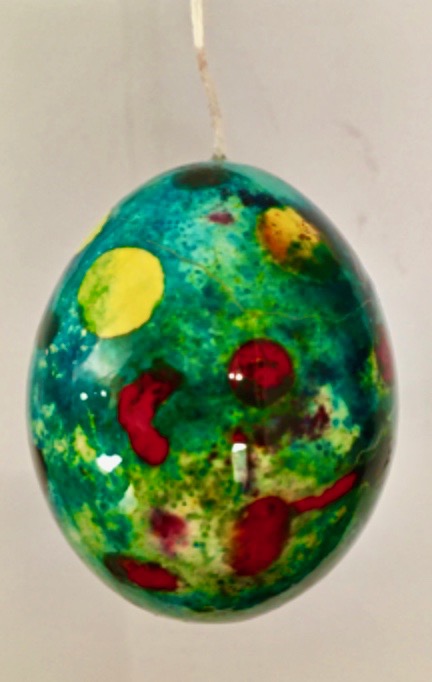
Twenty-five years later, Cabby was in the final phase of decorating 60 eggs hanging over the second floor balcony. I don’t mean simple-dipped-in-one-pastel-color-dyed eggs. I mean Eggs As Art.

In the 1990s, decorating small bare tree branches as “Easter Egg Trees” became popular in the United States. In the Tennis/Hewitt family, the first egg tree was produced in Cambridge, Massachusetts when their first-born, Liza, was a toddler. It consisted of a single branch decorated with a few colored eggs taken to a party of graduate school friends.
Following graduate degrees and the birth of a second child, Maddy and Cabby moved to Taiwan. In succeeding years, their egg tree tradition was shared with international school families from Taipei, to Cairo, to Johannesburg, to Saudi Arabia.
Watching the tradition unfold in Athens, I realized that an important annual event, merged with artistry, had created outreach and a ripple effect in international relationships. Families from different countries and cultures invited to the Egg Tree celebration often carried it forward. They began new traditions that passed on beyond the Tennis/Hewitt family.
Maddy inspires action. Cabby implements details. It’s one of the ways they complement each other. Together they prioritize the importance of nurturing the family they created with lasting traditions.


Cab also has a knack for research and prototyping. Since crafting the first egg tree, he experimented and fine-tuned the “how to” process of taking a raw white egg and turning it into something spectacular. The steps from A to Z are not for the impatient or the faint of heart. But, the results are dazzling.

In the beginning, there was trial and error. He blew out the egg interiors as a first step only to realize that empty eggs don’t sink in bowls of dye. There was year-by-year evolution, advancing the dyeing/waxing techniques used today. For example, randomly splattered candle wax creates only one type of pattern underneath–spots. So Cabby made small tools from toothpicks and wooden skewers that allow painting stripes, swirls, and even plaid patterns onto the shell with hot melted wax. Complexity and depth magically emerge after rounds of dyeing/waxing/dyeing/waxing on a single egg. Each egg reveals a surprise ending.


The bleaching process arose from a mistake of leaving an egg too long in one dye. Because it turned an ugly dark color, he wondered why not lighten it with bleach. A new step was added when he discovered bleaching enhanced the depth and range of dye colors.
Growing up overseas, the three Tennis children spent time around the table with their parents learning the egg dyeing craft. One Christmas, when they were older, each of them received a complete supply kit with containers, dye packets and tools to build their own egg tree and carry on the tradition after leaving home.
Oldest son, Whiting, took on the challenge first as a university student. Now married and teaching in an international school overseas, he produces spectacularly decorated eggs and invites faculty families to participate in the Egg Tree Party.

After leaving Athens, I thought about the generosity of sharing this family-centered tradition all over the world and how comfortably it links people together in international communities. Cabby and Maddy exemplify a natural ability to build and create inclusiveness in every one of their relationships.
The Tennis Family Egg Tree Tradition is one way their family has fostered love and respect in their global and personal family and friends network. It begins at home with a circle of people gathered around a bare branched tree covered with kaleidoscope colored eggs.
I’m reminded of the ending to the movie Annie Hall. The main character muses about the nuances of relationships, suggesting they are sometimes irrational, usually complex, and often absurd. He tries to sum up his feelings with a joke:
…A guy walks into a psychiatrist’s office and says, hey doc, my brother’s crazy! He thinks he’s a chicken. The doc says why don’t you turn him in? The guy says, I would but I need the eggs.
And, he’s right. We strive to hold onto each other in love, support and caring, because, actually, all of us…need the eggs.

This is the definitive “How-To” for dyeing and decorating eggs in the Tennis/Hewitt tradition. Instructions are by Cabby Tennis. There is minor editing on my part for clarity.
THE TENNIS FAMILY EGG TREE
WHY GO TO ALL THIS TROUBLE FOR A FEW COLORED EGGS?
- It brings family and friends around the table working creatively together.
- There is hands-on learning––coordination, art, safety, chemistry, physics, perseverance, patience and the final “wow” factor with each finished egg.
- There is grace and humility in overcoming a “Humpty Dumpty” moment of loss on the kitchen floor.
- It can become an annual family tradition.
- Eggs are beautiful.
GETTING STARTED
- Source dyes in craft shop or order online. Powdered dyes offer greater color variety. Suggested websites: Ukrainiangiftshop.com, BestPysanky.com, Ukrainianeggcessories.com
- Cover surface of worktable with taped together garbage bags, a vinyl tablecloth, or shower curtain liner. Layer of newspaper on top absorbs spills. Do not work over carpeting! Outside picnic table is ideal.
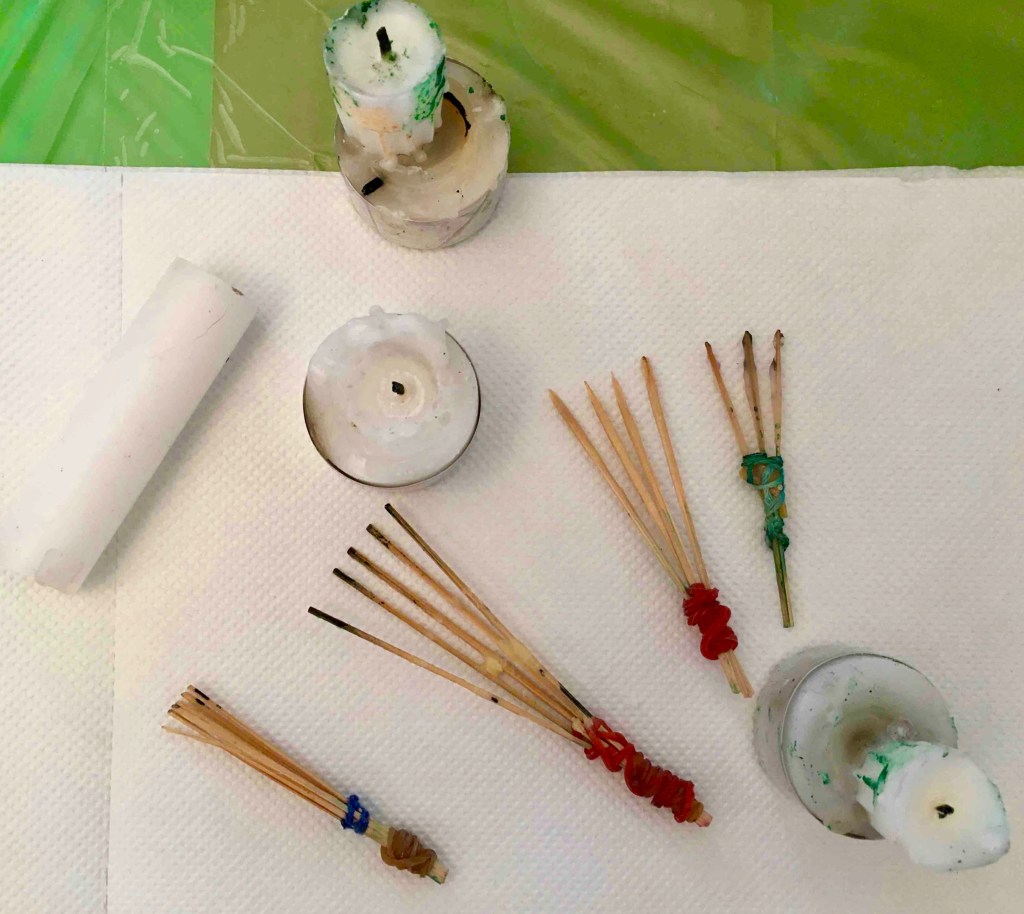
- Set up table with plastic gloves, liquid dye containers, plastic spoons, eggs, paper towels [pre-torn into a stack of single sheets], empty egg cartons, waxing tools [explained below], 3 bowls for bleach and rinse water, candles for waxing, small saucepan for hot melted wax, scissors, pen, scotch tape.

EGGS – Unstamped white eggs are best. Large [not XL] range free eggs tend to have stronger shells. Rinse under water–no soap. Eggs are dyed raw because they are heavier and will sink. Blowing them out comes later.
CONTAINERS FOR LIQUID DYES – Any glass jar [preferably with lid] such as jam jars, canning jars, etc. One plastic spoon per jar to prevent color mixing as eggs move between dyes. Leftover dye can be kept year to year, so save the jar tops. If not enough jars, use water glasses.

DYE MIXING – 1 packet powdered dye diluted with ¾-1 cup boiling water. Add 1 T. white vinegar. Apple or grape vinegar is ok. (Exception: No vinegar for orange dyes because they will curdle.] Follow package directions for diluting liquid concentrate dyes. Cut off color name from dye packet and tape on jar for reference.
WAXING METHODS
- Partially used taper candles set into aluminum tea candle base for dripping or sprinkling wax over eggs.
- A small saucepan with hot melted wax to use with tools [see below] or for complete immersion of egg into wax. Leftover candle remnants can be melted over low heat in saucepan on stovetop, camp stove, or hotplate. If no candles at home, purchase 2-3 thrift store pillar candles [any color] as melting base.


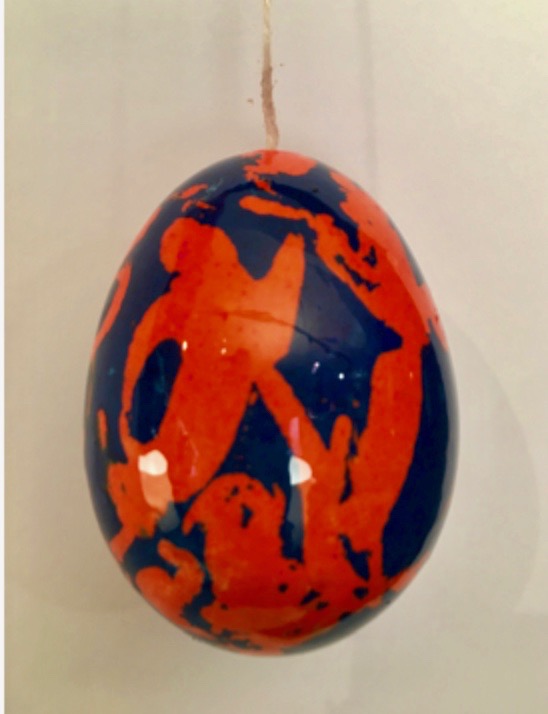
WAYS OF APPLYING WAX – Time to get creative. Holding a lit candle above egg, drip or shake/splatter wax onto shell. You can also use tools made from several toothpicks or split bamboo skewers bound with rubber bands to paint on wax. Repeatedly dip wooden tool into melted wax in saucepan, then touch or tap the egg with the tool. Egg color underneath the wax will be preserved and not take on next dye color. This is how you create different color patterns by waxing stripes, dots, or splatters on the dry egg. The number of colors on the egg depends how many times it goes through the cycle of 1. Wax 2. Dye 3. Dry.
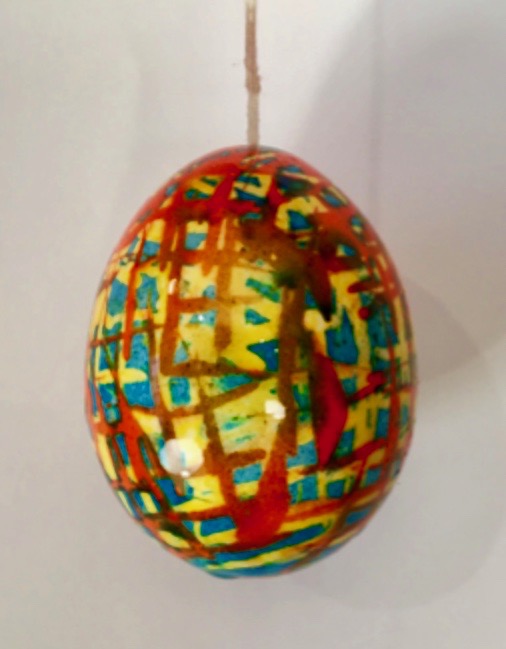


DUNK DYEING – Place waxed egg into any dye jar, then remove and gently dry with paper towel before waxing on a new layer of stripes or splatters. Repeat sequence as many times as you wish. Each wax application retains the color underneath it. Dyeing sequence is from light colors to dark. Begin with yellow [or any light color] moving toward darker colors each time you 1. Wax 2. Dye 3. Dry. Creativity and patience are keys to this technique.
BLEACHING as part of the dunk dyeing process – An optional but effective way to reverse the usual light to dark dyeing sequence. Bleach lets you cut through any final dye color [even black] that is un-waxed on the egg. Once the dark color is bleached, a lighter color can be dyed over it. This takes deft handling. Three bowls recommended. One with 1 part bleach to 2 parts water, and two [or 3] rinsing bowls with plain water. Dip the egg into bleach solution. Then move it through the rinse cycles, swirling thoroughly through each bowl. Egg continues to bleach with each step. Dry with paper towel. Note: The bleach will creep under some of the wax edges so be quick with the steps. You can do several rounds of 1. Bleach 2. Rinse 3. Dye 4. Wax 5. Dye and then repeat.
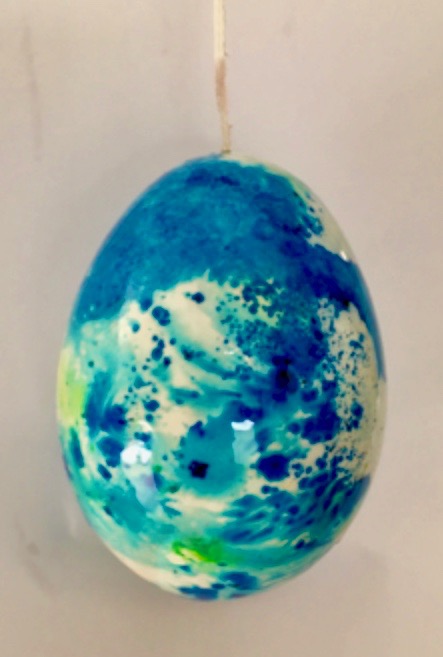
POWDER DYEING – This is a simple and efficient one step method to achieve beautiful eggs with the look of Monet water lilies or a ‘60s tie-dye experience. Eggs must be moist after soaking in plain water or liquid dye. Use leftover powder remnants [from envelopes used to make liquid dye] or open new ones specifically for this technique. With previously opened packets, write the color name on the outside to identify the powder inside.
METHOD FOR POWDER DYEING – Wearing clean, dry gloves lift a wet egg from bowl and hold each end between thumb and fingers. Tap the powder dye envelope against the egg to sprinkle grains onto the moist surface. Upon contact they will explode into fireworks shapes. Turn the egg and keep applying powder until it has the look you want. Use different colors, but be careful of combinations. Red, green and blue used together will turn brown. When desired color is achieved, quickly pat dry and immerse in saucepan of hot melted wax to seal. Or splatter with candle wax.

DE-WAXING EGGS – Wear gloves. Place used candle stubs or pillar candles into small saucepan over low to medium-low heat on stovetop. You need enough wax to completely immerse an egg. Have a stack of prepared paper towels nearby. With a slotted spoon, lower egg into the pan and stir gently, watching for wax coating to loosen and shed. [Stirring speeds up wax removal.] When the coating is clearly melted, add a second egg to the pan and lift first egg out. Rub loosened wax off first egg with paper towel. It should feel smooth with no rough spots and have a shiny patina. When wax in the pan starts to film over, time to re-heat on low temperature.
Safety note: Heat wax only until it liquefies. If it starts to smoke, it’s too hot and should be removed from heat.
Economy note: Place the saucepan of wax in the refrigerator overnight. The solidified wax will pop out the next morning. Store for re-use the next year.
BLOWING OUT THE EGGS – Use a bellows type egg blower. Good source: Best Pysanky Egg Blower. With the awl that comes in the kit, make a hole in the exact bottom of egg the size of a wooden kitchen matchstick. The bellows pumps air in and forces white and yolk out the bottom hole. Be gentle. Take your time. Too much pressure and egg can explode. Use a paper clip or thin wire to break yolk or un-jam clogs as needed. Do this in rounds, about 10 eggs in a round, letting each egg sit upright between rounds so gravity can help the insides move to the bottom. Next, do a “gravity shake”. Holding egg upright in fingers, firmly and repeatedly whack your wrist against the tabletop onto a paper towel. When drips emerge from bottom of egg, blow it out again. Repeat until nothing comes out of egg and it feels light and empty. Finally, carefully use the awl to make a hole the size of a thick paperclip in the top center of egg. This is where knotted string will be attached later.


BAKING THE HOLLOW EGGS – This removes the final film of wax and bakes inside of eggs to prevent spoiling. In a preheated metal pan, place 6 eggs at a time on their sides. Make sure both ends of egg are open and unplugged or egg can explode in the oven. Bake at 350 F for 4 minutes. Watch carefully so they don’t burn. Remove from oven and cover pan with foil or kitchen towel to retain heat. Place next pan of eggs in to bake. Quickly rub each baked egg with paper towel to remove any wax residue before it cools.


STRINGING THE EGGS – Use thin string such as dental floss or embroidery thread. Tie a knot and create a loop where the size of the knot barely fits inside top hole of egg. Hold the knot against the hole, and gently push it inside the egg with a paper clip. Expand hole with the awl if necessary. Line up strung eggs for gluing. One by one squirt a tiny dab of super glue into the hole. This affixes knot inside the egg. Let eggs rest on their sides [string parallel to table top] while glue dries. Avoid getting too much glue on the string above the egg as it will dry stiffly and can snap like a twig over time.

HANGING AND FINAL CLEANING OF EGGS – String a rope where eggs can be suspended at least 6 inches apart. Use large paper clips or loops of wire to attach eggs to rope. If inside the house, place drop cloths below to catch drips. Wear gloves and use a soft cloth to gently wipe each egg all over with paint thinner [white spirits in Europe]. Dry with another soft cloth to remove any residual wax. Let stand for 30 minutes. This step speeds up drying time of the lacquer.
LACQUERING THE EGGS – Use clear polyurethane [Varathane] or Spar Varnish to seal eggs and enhance colors with a durable finish coat. Varnish can be satin or gloss finish. [Cabby prefers gloss.] Dip fingers into the urethane and rub each egg, coating from top to bottom. Dab off accumulated drips with paper towel. Lacquer can take 1-3 days to dry. Eggs kept year to year can be re-lacquered annually. The Tennis family has one egg, “Jungle Book”, with over 15 coats and a deep hard shine.


NAMING [Optional, but great fun] – Give each egg a creative name–something it reminds you of. Examples from the 2020 collection: The Duke of Earl, Violet Sultana, Jigsaw Cyan, Fly Like an Eagle, Calypso, Sgt. Pepper, Tetherball, Clouds of Mercury, Purple Reign, Gilly Spring


BEST EGG TREES – Made with dry sticks or branches with many limbs. Bougainvillea branches are excellent. Bind branches with string or zip ties and place in a large vase or container, preferably metal. Fill with rocks/pebbles to keep branches secured and centered. Hang eggs in a pleasing arrangement.
THE EGG GIFTING TRADITION – Invite families with young children to your home. Have an Easter reading about the historic symbolism of eggs, the season of spring and renewal, or related meaningful traditions. Light hand held candles one by one around the circle, and sing, “This Little Light of Mine”. Pass a bowl of folded bits of paper with numbers on them. Eggs are chosen from the tree in numerical order. [Parents sometimes trade numbers so children can pick earlier.] Number 1 leaves the room after pre-selecting an egg in their mind. The group tries to guess which egg will be chosen. #1 returns, removes their egg and the sequence continues. The key is to keep the pace going without dampening the enthusiasm of conjecture.
Egg cartons are filled with selected eggs for each family to take home.
A new egg tree tradition begins.
Cabby has additional details such as video clips of different stages of the process and a movie of the complete 2020 egg line up with names included. For more information, contact: windowtoalifeoverseas@gmail.com

Discover more from A Taste of Mind
Subscribe to get the latest posts sent to your email.


Beautiful!!
LikeLike
What beautiful eggs, each it’s own work of art! I love the burst of colors on them. Thank you, Wen, for sharing this. Your directions were so detailed. I love you, sis🌈🥚
LikeLike
Love this Wendy- Forwarding it on to my whole family! see what happens this Easter!
LikeLiked by 1 person
Yes, please forward to One and All. It’s worth sharing even if you don’t know the main characters personally. We all can use some good news for a change…
LikeLike
Why I have no hair (a theory)
My dad was a theater arts teacher, scenic designer, architect, and watercolorist. Mostly, he worked, but if you could get his attention, especially at Easter time, he too became an egg artist. He wasn’t an egg artisan like Cabby, but his water-colored Easter eggs took your breath away. How I wish I had some photos. Alas, at our house all Easter eggs, once found, were eaten. When you peeled a watercolor egg there was a sort of pentimento image on the hard-boiled surface, where the paint had penetrated and stained. I don’t think you’re supposed to eat watercolor paint….but in effect, we did. And those paint toxins, I theorize, cause hair loss!
What a wonderful essay on friendship and art, Wendy! Thank you.
LikeLiked by 1 person
This is a great story remembering your artist father, Glenn. About your theory, I’m not so sure how well it holds up. But it’s funny! And you are too.
LikeLike
Dear Wendy🥰
Always great to read your articles💐
Hope you and the family are healthy in this special Corona-time🙏😷
All is fine with us in Oslo 🐣☀️💛
Let us hope… we’ll meet again this year❤️
Lots of love Annie❤️
LikeLiked by 1 person